
T.I.L.E.E = Task, Individual, Load, Environment, Equipment — a simple yet powerful checklist used to assess manual-handling risks before you lift, lower, carry, push, or pull. It’s a key part of the UK Manual Handling Operations Regulations, helping you protect both your body and your workplace from avoidable injuries. So, what does T.I.L.E.E stand for?
Or maybe you’ve seen others ask what does tilee stand for during safety training. In short, TILEE stands for the five main things you should think about before moving anything. Each one helps you make safer, smarter decisions in seconds.
Manual handling injuries remain a major workplace safety concern in the UK — but they’re also among the easiest to prevent when you understand T.I.L.E.E. This guide breaks it down clearly, giving you expert insights, practical examples and easy steps to apply T.I.L.E.E in real life. Whether you’re lifting boxes, supporting patients, or setting up a classroom, this method keeps things safe, efficient and stress-free.
Ready to handle tasks the right way — with confidence, care and zero strain? Let’s explore what makes T.I.L.E.E the gold standard in manual-handling safety.
What Does T.I.L.E.E Stand For?
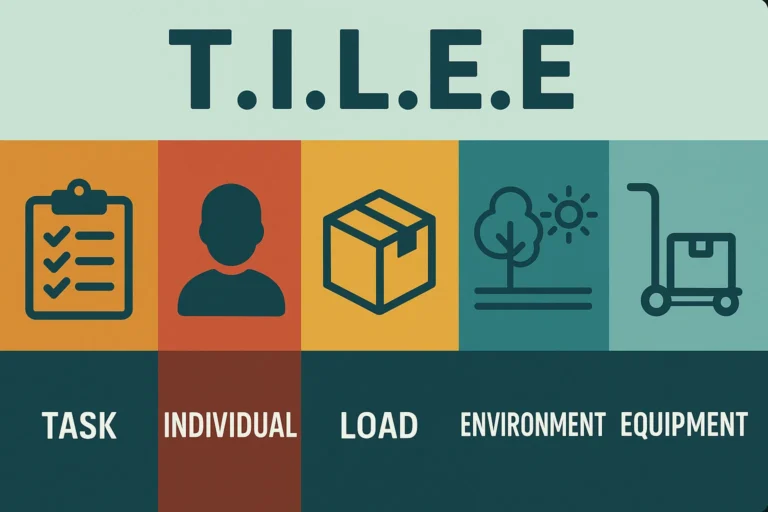
So, T.I.L.E.E might sound like just another safety acronym, but it’s actually a really smart little tool that keeps you — and everyone around you — safe while lifting, carrying, or moving things at work. Let’s break it down!
T.I.L.E.E stands for Task, Individual, Load, Environment and Equipment.
You might have already heard of TILE before — it’s the classic version used in most manual-handling training. The only difference here is that T.I.L.E.E adds one extra letter: E for Equipment. That tiny addition makes a big difference because it reminds you to check if the tools or machines you’re using are safe, working properly and right for the job.
In short, what does tile stand for? It stands for Task, Individual, Load, Environment — the four main things you check before moving anything. But when we say T.I.L.E.E stand for, we include Equipment, too. This makes it a complete, modern and practical checklist that’s easy to remember and quick to use.
Think of T.I.L.E.E as your on-the-spot safety buddy — always there to help you make smart choices before you lift, push, or pull. You can use it anywhere, anytime. Just pause, run through each step in your head and you’ll instantly know if the task is safe to do or if something needs changing.
It’s a simple, repeatable, real-world check — not a boring form or long process. And the best part? It only takes a few seconds, but it can save you from days or even weeks of back pain or injury.
So next time someone asks, “Hey, what does T.I.L.E.E stand for?” — you’ll know it’s not just an acronym; it’s your go-to safety guide for smarter, safer working.
Is T.I.L.E.E a Legal Requirement?
T.I.L.E.E is a practical memory tool. The law does not name it as a separate legal requirement. However, it helps employers follow the Manual Handling Operations Regulations 1992. These regulations require employers to:
- Avoid hazardous manual handling where reasonably practicable.
- Assess tasks that cannot be avoided.
- Lower the chance of injury as much as reasonably possible.
Using T.I.L.E.E alone does not guarantee legal compliance. Employers must still complete a suitable assessment and introduce proper safety controls.
T: Task — What Does It Cover?
Before doing any manual-handling job, think carefully about the task itself. Are you lifting, lowering, carrying, pushing, or pulling? Will you need to twist, reach, or work on stairs or uneven ground?
The acronym TILE starts with the task from “T”— because how you handle an activity depends entirely on what it involves. Ask yourself: can the task be avoided, redesigned, or shared with someone else? Taking a moment to plan can prevent strain, slips and injuries later on.
I: Individual — Why Does the Person Matter?
The “I” highlights the individual — the person doing the task. Everyone has different strengths, levels of training, and physical limits.
Consider factors like fitness, experience, height, or health conditions such as pregnancy or past injuries. Make sure the right person is doing the right job and that proper training is given before anyone handles potentially risky loads. Remember, good teamwork and honest communication make every workplace safer.
L: Load — What Is Included Here?
The “L” in TILE focuses on the load — what’s actually being moved. What does tile stand for? It reminds you to check details such as the load’s weight, size and stability.
Is the object awkwardly shaped, too heavy, or difficult to grip? Could it spill, shift, or hide your view while carrying it? If so, see if you can reduce the risk — maybe by repacking it, splitting it into smaller parts, or asking for help. Understanding the load helps you stay in control and avoid accidents.
E: Environment — What Do You Look At?
Next, take a good look at your surroundings. The tile stands for checking the environment — the space you’ll be working in and moving through.
Is the floor dry and level? Are there steps, slopes, or clutter in the way? What about lighting or weather conditions if you’re working outdoors? Planning your route and clearing obstacles before starting can make the task much smoother and safer.
E: Equipment — Why Is This Extra “E” Important?
The final “E” stands for Equipment. This extra step turns TILE into T.I.L.E.E — a modern version that helps you make the most of handling aids such as trolleys, dollies, hoists, or slide sheets.
Always check that your equipment is in good condition: are the brakes working, batteries charged and tools stored correctly? Using safe, suitable equipment reduces strain and supports your body during demanding tasks. Make it a habit to inspect before you lift — it’s one of the simplest ways to prevent injury.
Is There a Legal Manual Handling Weight Limit?
UK law does not set one maximum lifting weight for every worker.
A load may feel safe in one situation but dangerous in another. For example, lifting a box once differs from lifting it repeatedly.
The risk also changes when someone must carry the load upstairs or across a long distance.
A manual handling assessment should consider:
- The weight of the load.
- The size and shape of the load.
- How often someone moves it.
- The distance they must carry it.
- The height of the lift.
- The worker’s posture.
- The quality of the grip.
- The worker’s health and ability.
- The condition of the workplace.
The HSE provides guideline figures to help identify higher-risk tasks. However, these figures are not safe lifting limits. Employers must assess the complete activity before deciding whether it is safe.
How to Use T.I.L.E.E in a Risk Assessment?
Using T.I.L.E.E is about thinking before you move. The TILE stands for five simple checks — Task, Individual, Load, Environment and Equipment — that help you plan, act and review safely. Here’s how to apply it step-by-step in a manual-handling risk assessment.
1. Avoid the Task if You Can
The safest lift is the one you don’t do. Before anything else, ask yourself whether the task can be avoided, redesigned, or done by machine instead. If a trolley, conveyor, or hoist can do the heavy work, use it. Before anything else, see whether manual handling can be avoided.
2. Work Through T → I → L → E → E
If you must handle the load manually, go through each stage in order.
- Task: What movements are involved — lifting, lowering, carrying, pushing, or pulling? Are there stairs, turns, or long distances?
- Individual: Is the person trained and physically able to perform the task? Do they need help or a team lift?
- Load: Check the weight, size, shape and stability. Can it be made lighter or more balanced?
- Environment: Look at the route and workspace. Are there trip hazards, slopes, or poor lighting? Clear and prepare the area first.
- Equipment: Choose the right aid, such as a dolly or hoist. Inspect it — are the brakes working and batteries charged?
These steps are what what does tile stands for in real life — a practical sequence to spot and control risks before anyone starts moving the load.
3. Record What You Find
Write down your findings once you’ve gone through the five elements. Describe the risks, list the controls you’ll use and note who is responsible. This record should align with the Manual Handling Operations Regulations (MHOR), showing that you’ve properly assessed and managed potential hazards.
4. Control the Risks
Put your plan into action. Brief your team so everyone understands what to do, who’s involved and what equipment to use. Supervise the first attempts and correct anything unsafe immediately. Clear instructions and strong teamwork reduce the risk of accidents.
5. Review and Improve
Take a moment to review after the job is done. Were there any near misses? Did the plan work well, or could something be improved next time? Updating your process based on real experiences helps make future manual-handling tasks even safer and more efficient.
T.I.L.E.E Risk Assessment Example
Imagine a warehouse worker needs to move an 18 kg box. The box sits on the floor. The worker must carry it for ten metres. They must then place it on a storage shelf. Here is how T.I.L.E.E could support the assessment.
Task
The task involves:
- Lifting the box from floor level.
- Carrying it for ten metres.
- Turning around a corner.
- Placing it above waist height.
The worker should first check whether equipment can remove part of the task.
Individual
The worker has completed manual handling training. However, they recently reported mild back pain. The supervisor should consider:
- Asking another worker to complete the task.
- Giving the worker extra support.
- Dividing the load into smaller parts.
- Moving the worker to a lighter duty.
Load
The box weighs 18 kg. It has no handles and the contents may move. Possible controls include:
- Dividing the contents into smaller boxes.
- Repacking the load.
- Adding secure handles.
- Asking another worker for help.
Environment
Loose wrapping material blocks part of the route. One area also has poor lighting. Before starting, the team should:
- Remove the wrapping material.
- Clear the complete route.
- Improve the lighting.
- Check the floor for spills.
- Keep other workers away from the route.
Equipment
A trolley is available nearby. However, one wheel feels loose. The worker should not use damaged equipment. They should report the fault and find a safe trolley.
Final Decision
The team divides the contents into smaller boxes. They clear the route and use a suitable trolley. These controls reduce the lifting distance. They also improve control and protect the worker’s back.
Who Is Responsible for Manual Handling Safety?
Employers hold the main legal duty for managing workplace manual handling risks. However, employees must follow the safety measures and training provided.
Employer Responsibilities
Employers should:
- Avoid unnecessary manual handling.
- Identify hazardous tasks.
- Complete suitable risk assessments.
- Provide appropriate handling equipment.
- Maintain equipment properly.
- Give workers suitable information and training.
- Consider individual health needs.
- Consult workers about practical risks.
- Monitor workplace procedures.
- Review assessments when conditions change.
Employee Responsibilities
Employees should:
- Follow workplace procedures.
- Use handling aids correctly.
- Check equipment before using it.
- Report damaged equipment.
- Report unsafe workplace conditions.
- Tell their employer about health concerns.
- Ask for help when needed.
- Avoid taking unnecessary risks.
Training remains important. However, training alone cannot make an unsafe task safe. Employers should first improve the task, load, equipment and working environment.
Why Manual Handling Safety Still Matters?
Manual handling remains a major workplace health and safety issue across Great Britain.
Latest workplace safety data from the HSE shows:
- 511,000 workers had muscle, joint, or back problems caused by work in 2024/25.
- These health problems made up 27% of all work-related illnesses.
- Workers took around 7.1 million days off work because of these problems.
- On average, each worker lost around 14 working days.
- Around 680,000 workers had an injury at work.
- Employers officially reported 59,219 workplace injuries under RIDDOR.
These injuries may harm the back, shoulders, arms, joints and muscles. They can also stop someone from working for several days or longer.
T.I.L.E.E vs TILE vs TILEO — What’s the Difference?
When it comes to manual handling, you might see a few different versions of the same idea — TILE, TILEO and T.I.L.E.E. They all aim to help you lift, carry, push, or pull safely, but each version adds something a little different. Let’s break them down clearly.
TILE – The Classic Four-Step Check
The original and most widely used acronym is TILE which stands for Task, Individual, Load and Environment.
So, what does ’tile’ stand for?
It’s the foundation of safe manual handling. You look at:
- Task: What you’re doing — lifting, lowering, carrying, pushing, or pulling.
- Individual: Who’s doing it — their strength, training and health.
- Load: What’s being moved — its weight, shape, or stability.
- Environment: Where it’s happening — space, lighting, floors and obstacles.
TILE helps workers and supervisors carry out quick, effective risk checks before starting a task.
TILEO – Adding the “O” for Other Factors
Over time, workplaces realised there were extra risks that didn’t fit neatly into those four categories. That’s when TILEO came along.
So if you’ve seen tileo manual handling mentioned in training, or wondered about tileo meaning and tileo means, here’s the answer:
The “O” stands for Other factors — anything else that might affect safety. That could include:
- Wearing PPE (personal protective equipment) like gloves or goggles.
- Working under time pressure or to a tight schedule.
- Communication — are instructions clear and does everyone understand the plan?
Adding “O” reminds you to think beyond the obvious — because even a small distraction or rush can lead to an accident.
T.I.L.E.E – Highlighting Equipment
Finally, T.I.L.E.E builds on the same foundation but makes Equipment a separate, visible step. This version is especially useful in modern workplaces where mechanical aids, hoists, or trolleys are available but sometimes overlooked.
By explicitly including Equipment, T.I.L.E.E ensures you always ask:
- Can a tool or device make this job safer?
- Is the equipment suitable, working properly and ready to use?
- Have I been trained to use it safely?
It’s a simple change that helps prevent injuries and promotes a culture of smarter, safer working.
Why the Difference Matters
Whether you use TILE, TILEO, or T.I.L.E.E, the goal is the same — to make every lift safer and every worker more aware. But the newer versions, especially T.I.L.E.E, encourage you to think more broadly about modern tools, teamwork and real-world conditions.
Understanding these variations means you’re not just following a checklist — you’re developing professional judgment. That’s what turns safety knowledge into confident, competent practice.
When Do You Need a More Detailed Assessment?
T.I.L.E.E offers a useful starting point. However, some tasks need a more detailed assessment.
A detailed assessment may help when:
- Workers handle heavy loads regularly.
- The task involves repeated lifting.
- Load weights change throughout the day.
- Workers push or pull heavy equipment.
- Several people lift the same object.
- The task involves awkward postures.
- Workers have reported pain or injuries.
- The working environment has several hazards.
The HSE provides different assessment tools for these situations.
MAC Tool
The Manual Handling Assessment Charts help assess:
- Lifting tasks.
- Carrying tasks.
- Lowering tasks.
- Team handling tasks.
The MAC tool uses numbers and colour bands. These features help highlight higher-risk activities.
V-MAC Tool
The Variable Manual Handling Assessment Chart supports tasks where load weights change.
It may help with:
- Parcel sorting.
- Order picking.
- Vehicle loading.
- Vehicle unloading.
- Warehouse operations.
RAPP Tool
The RAPP tool helps assess tasks that involve pushing or pulling such as:
- Trolleys.
- Cages.
- Carts.
- Wheeled equipment.
- Loads pushed without wheels.
ART Tool
The Assessment of Repetitive Tasks tool focuses on repeated movements involving the arms and hands. These tasks often appear in:
- Packing.
- Sorting.
- Assembly work.
- Processing work.
- Production work.
- Regular hand-tool use.
These tools support a complete risk assessment. However, one tool may not cover every workplace risk.
Why T.I.L.E.E Matters for Workplace Safety
T.I.L.E.E is more than just a safety checklist. It helps everyone work smarter, stay safe and feel confident when handling loads. Here’s why it matters so much at work:
1. Fewer Injuries
Using T.I.L.E.E helps reduce back pain, muscle strain and other common injuries. By thinking through each step, you can spot problems early — like a heavy box, uneven floor, or poor lifting technique — and fix them before anyone gets hurt.
2. Meets the Law (MHOR)
The Manual Handling Operations Regulations (MHOR) say employers must avoid or reduce manual-handling risks. T.I.L.E.E helps you do that. It shows that you’ve planned the job properly, used the right equipment and taken safety seriously.
3. Better Planning
When you follow T.I.L.E.E, jobs run more smoothly. You plan your route, choose the right people and use the best equipment. That means fewer delays, less confusion and safer, faster work.
4. Stronger Safety Culture
T.I.L.E.E helps build a workplace where everyone looks out for each other. It encourages teamwork, communication and confidence. When safety becomes a habit, everyone feels more supported and valued.
5. Smarter Teams
Knowing what tile stands for helps people make better decisions every day. Whether it’s lifting a box, moving furniture, or supporting a patient, T.I.L.E.E gives workers the tools to handle tasks safely and efficiently.
How to Lift and Carry a Load Safely?
A risk assessment should always come before lifting. Good technique supports other safety measures.
However, safe lifting techniques cannot replace suitable equipment or workplace improvements.
Plan the Movement
Before lifting:
- Decide where the load will go.
- Check the complete route.
- Remove boxes, cables and packaging.
- Check whether you need help.
- Use suitable handling aids where possible.
- Plan a resting point for a long lift.
Keep the Load Close
Keep the load close to your waist for as long as possible. Place the heaviest side near your body. Avoid holding the object at arm’s length.
Use a Stable Position
Place your feet apart. Put one foot slightly forward to improve your balance. Wear suitable shoes and clothing. Tight clothing or unsafe footwear may restrict movement.
Get a Secure Grip
Hold the load firmly with both hands where possible. Keep the load close against your body. Do not start when the object feels unstable.
Bend Carefully
Use a slight bend in your back, hips and knees. Avoid fully bending your back. You should also avoid a deep squat unless the task requires one.
Avoid Twisting
Keep your chest and hips facing one direction. Move your feet when turning. Do not twist your back while carrying the load.
Move Smoothly
Lift and lower the object smoothly. Do not jerk or snatch it. Sudden movements can make the load harder to control.
Keep Your Head Up
Look ahead after securing the load. This position helps you see the route and maintain a safer posture.
Put the Load Down Before Adjusting It
Put the object down before changing its exact position. Sliding it after placement may feel safer than holding it while adjusting. The HSE advises workers not to handle more than they can easily manage. What someone can lift may differ from what they can safely lift.
How to Make Team Handling Safer
Team handling does not automatically remove manual handling risks. Different heights, strengths and movements can make the load unstable. Good communication remains essential.
Before a team lift:
- Choose one person to lead.
- Agree on simple instructions.
- Check everyone understands the route.
- Place workers according to height and strength.
- Make sure everyone has a secure grip.
- Confirm where the team will place the load.
- Remove hazards from the route.
- Check that everyone can see clearly.
During the lift:
- Lift at the same time.
- Move at the same pace.
- Avoid sudden movements.
- Follow the team leader.
- Stop when someone feels unsafe.
- Lower the load together.
A trolley, hoist, or another aid may still provide a safer option. The team should use suitable equipment whenever it reduces the risk.
Common T.I.L.E.E Assessment Mistakes
A checklist only works when people use it correctly. Rushing through an assessment can leave important risks unnoticed.
Common mistakes include:
- Checking only the load’s weight.
- Ignoring repeated lifting.
- Forgetting the return journey.
- Failing to check the worker’s health.
- Using damaged handling equipment.
- Failing to clear the route.
- Ignoring poor lighting.
- Assuming training removes every risk.
- Choosing team lifting without a leader.
- Using one assessment for different tasks.
- Failing to consult workers.
- Never reviewing the assessment.
A good assessment should match the real task. It should also reflect the worker, equipment and conditions present that day.
T.I.L.E.E Checklist Before You Start
Use this quick checklist before any manual handling activity.
Task
- Can we avoid the task?
- Can a machine complete it?
- Does the task involve twisting?
- Does it involve reaching?
- How far must the load travel?
- Will the worker use stairs?
- Does the task involve repeated movement?
Individual
- Has the worker received suitable training?
- Can they complete the task safely?
- Are there any current injuries?
- Could a health condition affect the task?
- Is extra help needed?
- Would a team lift make the task safer?
Load
- How much does the load weigh?
- Can workers see the weight clearly?
- Will the load stay stable during movement?
- Can the worker hold it securely?
- Might the contents shift inside?
- Could it block the worker’s view?
- Can the load be split into smaller parts?
Environment
- Is the floor clear of obstacles?
- Are there any spills or wet areas?
- Does the route have enough space?
- Can the worker see the path clearly?
- Will they need to use steps or slopes?
- Could heat, cold, or poor airflow affect the task?
- Might the weather create extra risks?
Equipment
- Is suitable equipment available?
- Is the equipment safe?
- Do the brakes work?
- Are batteries fully charged?
- Has the worker received equipment training?
- Can a trolley or hoist reduce the risk?
- Has someone reported any defects?
Final Thoughts: Make T.I.L.E.E a Habit Before You Lift
Safety starts with awareness. The tile stands for Task, Individual, Load, Environment and Equipment — five simple checks that help you pause, plan and protect yourself before you lift, carry, push, or pull anything.
When you make T.I.L.E.E a habit, you’ll start noticing risks before they happen. You’ll think about posture, space and teamwork automatically. Over time, that small habit builds safer routines, fewer injuries and a stronger sense of confidence at work.
But don’t stop here — turn what you’ve learned into practical, professional skills.
Take your understanding further with the Manual Handling Course from School of Healthcare. This training gives you the knowledge, techniques, and confidence to assess risks, move safely and meet workplace safety standards.
Start today, protect your health and build a safer future — one lift at a time.
Frequently Asked Questions (FAQs)
What does T.I.L.E.E mean?
T.I.L.E.E stands for Task, Individual, Load, Environment and Equipment. It’s a simple way to assess risk before you lift, carry, push, or pull anything. Each step helps you check for hazards and choose the safest way to handle a load.
What does T.I.L.E.E stand for in the NHS?
In the NHS, T.I.L.E.E is used in the same way — to promote safe manual handling for healthcare staff. It helps nurses, carers and support workers think about each task carefully before moving patients, equipment, or supplies. The goal is to protect both staff and patients from injuries.
What is a T.I.L.E.E risk assessment?
A T.I.L.E.E risk assessment is a short checklist used before doing any manual-handling task. You look at the Task, Individual, Load, Environment and Equipment to find possible risks and decide how to control them. It’s part of staying compliant with the Manual Handling Operations Regulations (MHOR) in the UK.
What does “I” mean in TILE?
The “I” in TILE stands for Individual. It reminds you to think about the person doing the task — their strength, training, health and experience. Everyone is different, so it’s important to make sure the job suits the person.
What does the “E” in T.I.L.E.E stand for?
The extra E stands for Equipment. It’s there to remind you to use handling aids like hoists, trolleys, or slide sheets whenever possible. Using the right equipment makes manual handling safer, easier and less tiring.
How does T.I.L.E.E work?
T.I.L.E.E works as a quick, repeatable process before any manual-handling task. You simply pause and check:
- Task – What are you doing?
- Individual – Who’s doing it?
- Load – What are you moving?
- Environment – Where are you doing it?
- Equipment – What tools can help?
This simple habit helps reduce strain, prevent injuries and keep everyone safe at work.
Is there a maximum lifting weight at work?
No single legal maximum applies to every manual handling task.
Employers must assess the:
- Task.
- Worker.
- Load.
- Environment.
- Available equipment.
The safe choice also depends on posture, frequency, distance, grip and individual ability.
What does “lite” mean in beer?
In beer, “lite” usually means the drink has fewer calories or less alcohol than a regular version. It’s unrelated to manual handling, but an easy one to remember — “lite” just means “lighter.”
What are the 4 types of alerts and codes?
In healthcare or emergency settings, there are many alert codes (like Code Red for fire or Code Blue for a medical emergency). The exact types depend on your organisation, but they all help staff respond quickly and safely in different situations.