
A sink can fit neatly into your worktop but still cause leaks or drainage problems underneath. That’s because the pipes, seals and waste trap must connect properly for everything to work. So, knowing how to install a sink plumbing system starts with checking your existing water supply and drainage. Make sure the fittings match and the waste pipe has enough slope for water to drain. Then shut off the water, fit the tap and waste outlet, secure the sink and connect the pipes. Finally, test every joint for leaks. These checks help prevent hidden water damage and keep your sink draining properly.
Now, let’s explore the eight practical steps to install your sink plumbing correctly and avoid common mistakes.
What Should You Check Before Connecting a New Sink?
Check the old pipe layout before you buy or remove any fittings. A new sink can sit neatly in the worktop yet leave no room for its trap. For example, a deeper bowl puts the waste outlet closer to the shelf below. That can make the old drain connection too high. So what should you measure before you start?
- Water supply: Find the isolation valves or main stopcock. Make sure they shut the water off fully.
- Waste outlet: Compare the new sink’s outlet with the drain point in the wall or floor.
- Cabinet space: Leave room for the trap, tap tails, drawer rails and access for repairs.
- Old fittings: Check the pipe ends, outside sizes, worn seals and any signs of rust or damage.
- Sink design: Check the tap holes, overflow, waste kit and type of mounting clips or support.
What Size Waste Pipe and Trap Does Your Sink Need?
A kitchen sink in England usually needs a 40mm waste trap with a 75mm water seal. However, a bathroom sink often uses a smaller 32mm trap with the same seal depth. The water seal holds a little water inside the trap to stop bad smells coming up from the drain. These sizes come from England’s Approved Document H. Other parts of the UK have their own building rules, so check the guidance for your area.
Pipe size is only part of the choice. But why? The pipe also needs the right fall, which means a gentle drop towards the drain. For certain unventilated sink branches, England’s guide shows 3 metres for 40mm pipe. It shows 4 metres for 50mm pipe, under the stated design conditions. Those figures are not a free pass to extend any old waste run.
What Tools and Parts Do You Need to Plumb a Sink?
You do not need a box full of costly kit for every sink swap. You do need parts that match the tap, trap and old pipes. Look inside the sink waste kit before buying spare seals. Many kits already contain the washers and clips you need. Keep these four groups close to hand when you work.
- Measuring and fitting: Tape measure, screwdriver, adjustable spanner and a tap wrench if access is tight.
- Water supply: Correct tap tails, matching valve fittings, good washers and working isolation valves.
- Waste route: Sink waste kit, trap, pipe, suitable bends and pipe clips to hold the run steady.
- Cutting and testing: Pipe cutter or fine saw, tool to smooth cut edges, bucket, cloth and kitchen roll.
How Do You Choose the Right Seal for Each Sink Connection?
The right seal depends on how the sink pipes connect. Most flexible tap hoses have rubber washers or built-in seals to stop leaks. Similarly, plastic waste pipe joints often use shaped rubber washers inside special fittings. These seals help keep water inside the pipes when you fit them correctly.
But do all threaded joints need PTFE tape? No. Adding tape to fittings with rubber washers can stop the seals from sitting properly and cause leaks. However, solvent-weld waste pipes need the right pipe glue and enough time to dry fully. Always follow the maker’s instructions and avoid tightening too much. This can damage the washers or crack the plastic fittings.
How to Install a Sink Plumbing System With Existing Pipework?
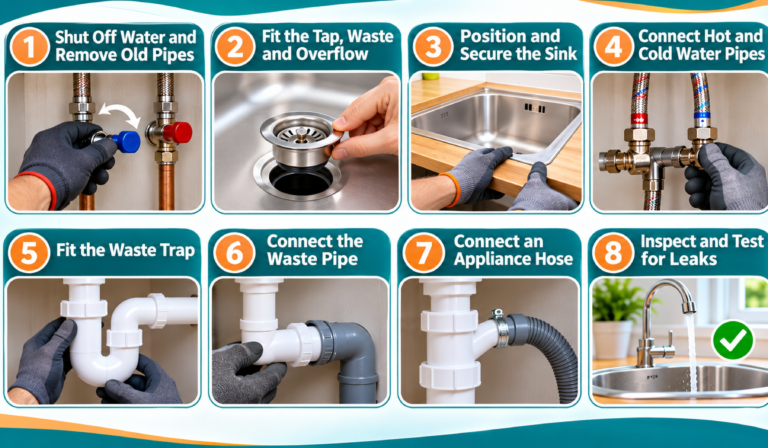
The best way to install kitchen sink plumbing is to work from the sink outwards. Fit the parts that are hard to reach while the bowl is still loose. Then secure the sink, connect the water supply and assemble the drainage system. However, the exact order can vary depending on your sink design. Follow these eight steps to complete the installation correctly.
Preparing the Sink and Its Main Parts
Step 1: Shut Off the Water and Remove the Old Pipes
Close the water shut-off valves under the sink and open the tap to let any water out. If the water keeps flowing, turn off the main water supply. Check the tap again before removing any pipes. Place a bucket under the waste trap as it may still hold dirty water. Then carefully remove the old tap hoses and waste pipes.
Once you remove the pipes, check their ends for rust, cracks or other damage. Clean off any dirt or old sealant from the areas where the pipes connect. This helps the new washers and fittings sit properly and stop leaks. If you find damaged pipes or faulty valves, get them fixed before you carry on.
Step 2: Fit the Tap, Waste Outlet and Overflow
Place the loose sink on a soft cloth to protect it from scratches. Fit the tap hoses and base seals as the maker advises. Secure the tap and make sure it sits straight. Then place the waste outlet into the sink’s drain hole with the correct rubber seal. Hold the part underneath steady while tightening the top. This helps keep the seal flat and in place.
If your sink has an overflow, connect its hose and seal. Make sure the hose has no sharp bends or loose loops. Some waste kits use a screw in the middle, while others have a large nut underneath. So check that all the parts fit and sit correctly before tightening them. This helps stop water leaking from the waste outlet or overflow.
Securing the Sink and Connecting Its Water Supply
Step 3: Position and Secure the Sink
Carefully lower the sink into the clean, dry hole in the worktop. Check that it sits straight and in the right place. A sink that sits on top of the worktop usually has fixing clips under its edge. Tighten the clips evenly to keep the sink level and secure. Also, make sure the worktop can hold the sink’s weight. Do not use silicone alone unless the maker says it is safe.
If you can see bare chipboard around the hole, cover it with a suitable waterproof seal. Otherwise, water can get inside and make the wood swell. Then apply the recommended seal around the sink’s edge and wipe away any extra before it dries. Remember, sinks fitted underneath the worktop need different clips and supports.
Step 4: Connect the Hot and Cold Water Pipes to the Tap
Find the hot and cold water pipes before connecting the tap hoses. Check that the hoses, threads and fittings match the water shut-off valves. Most flexible tap hoses have rubber washers or built-in seals to stop leaks. Start tightening each nut by hand. Then, use a spanner as the maker advises. Hold the valve steady and make sure the hoses do not twist or bend too much.
If you have fitted or moved any water pipes, flush them as the fitting instructions explain. This helps clear dirt and small bits that could block or damage the tap. Also check the backflow protection if your tap has a pull-out spray hose. This stops dirty water from flowing back into the clean water supply. Some taps need more than a basic check valve. If you are unsure, ask a qualified plumber for help.
Fitting the Trap and Connecting the Waste Pipe
Step 5: Fit the Sink Waste Trap
The trap is the U-shaped or bottle-shaped part under the sink drain. It holds a little water to stop bad smells coming up through the pipes. Choose a trap that fits the sink outlet and has enough space inside the cupboard. Also, make sure there is room to connect it to the drainpipe. Keep the part you open for cleaning easy to reach.
Fit each rubber washer as the manufacturer’s instructions show. If your sink has two bowls, you may need a special waste kit to connect both drains. Then line up the trap with the waste pipe before tightening the joints. Do not force the parts together, as this can damage the joints and cause leaks.
Step 6: Connect the Sink Waste Pipe to the Drain
Measure the gap between the trap and the drain before cutting the waste pipe. Mark the right length and cut the pipe straight. Smooth any rough edges so the parts fit well. Then check that all the pipes line up before joining them. Make sure the waste pipe slopes down towards the drain, with no dips where dirty water can collect.
Also, check that the pipes and fittings match. Push-fit and solvent-weld pipes marked 40mm can have different outside sizes. A suitable universal compression fitting can join some of these pipes. However, always use the right joining method and allow enough drying time where needed. Tighten plastic nuts as the maker advises but do not use too much force. Finally, use pipe clips to hold everything firmly in place.
Step 7: Connect an Existing Appliance Waste Hose
Some sink traps have an extra connection for a dishwasher or washing machine. Check that it fits the appliance hose and allows water to drain properly. If the connection has a plug or sealed opening, open it as the trap instructions explain. Then attach the hose and hold it firmly with the correct clip. Also place the hose as the appliance maker advises. Keep any unused connections sealed to prevent leaks.
Step 8: Inspect All Connections Before Testing
Check all the pipes and fittings while the cupboard is still empty. Make sure every connection is tight and easy to reach for future repairs. Also, open nearby drawers to check they do not touch the pipes. Look for bent hoses, loose pipes or missing plugs on unused appliance connections.
Make sure any sealant or pipe glue has fully dried or set before turning on the water, m. Check that no tools or loose items remain under the sink. Once everything looks right, test the water supply and waste pipes for leaks.
How Does Bathroom Basin Plumbing Differ from Kitchen Sink Plumbing?
Bathroom basin plumbing works much like kitchen sink plumbing but the waste fittings and pipe sizes differ. Kitchen sinks commonly use 40mm waste pipes, while bathroom basins usually use 32mm pipes. Both need a suitable waste trap to drain water and prevent unpleasant smells.
However, the basin’s overflow design also matters. A basin with an overflow normally needs a slotted waste fitting to let excess water drain away. In contrast, a basin without an overflow usually needs an unslotted waste. Bathroom basins also commonly use click-clack wastes and bottle traps. If your basin has a pedestal or vanity unit, limited space can make fitting and accessing the pipes harder.
How Do You Test Sink Plumbing for Leaks and Drain Problems?
A dry cupboard does not always mean your new sink has no leaks. Water supply pipes carry water under pressure. However, a full sink sends a lot of water through the waste pipes when you empty it. So, you need to test both sides. Place dry kitchen roll under the pipe joints to spot even small drips. Then, follow these five checks in order.
- Supply check: Open the valves slowly and look for drips at each hose, nut and valve.
- Tap check: Run hot and cold water. Watch the tap base and check the flow.
- Full-bowl check: Fill the sink safely, pull the plug and watch the trap and waste joins.
- Overflow check: Where fitted, send water into the overflow without spilling it over the rim.
- Late check: Wipe all joints dry and look again later for tiny wet marks or drips.
Why Is Your New Sink Leaking, Smelling or Draining Slowly?
Most sink problems give you a clue about where to check. For example, water near the tap often means a problem with the water supply pipes. Drips under the plug hole can mean the waste seal is leaking. However, slow drainage or bad smells can have different causes. So, check the signs below before taking all the pipes apart.
| What you notice | What might cause it | What to check |
| Drips below the tap | Loose hose or worn washer | Tap tails and valve seals |
| Water around the waste | Poorly seated gasket | Waste outlet and seal |
| Slow drainage | Blockage or poor pipe route | Waste pipe and bends |
| Gurgling or bad smells | Trap water lost or air-flow fault | Trap seal and drain layout |
| Leak near appliance hose | Loose hose or open inlet | Side spigot and clip |
Which Sink Plumbing Mistakes Can Cause Problems Later?
A sink might work well during a quick tap test but start leaking after a few days. Usually, this happens when the pipes or fittings do not fit properly. As the pipes move, loose joints can cause leaks. So, check these four things while you can still reach the parts easily.
- Forced joints: Bring pipe ends together in line. Do not use a nut to pull a gap shut.
- Mixed pipe systems: Check the outside size and joint type before joining two waste pipes.
- Loose pipe runs: Clip the pipe so stored items or drawers cannot knock it out of line.
- Wrong fitting method: Use the supplied seals, tightening method and cure time for each part.
When Should You Call a Plumber Instead of Fitting the Sink Yourself?
You can often replace a sink if its old supplies and drain are sound. The new parts also need to fit the same layout. But stop if the valves fail, pipes crumble or the drain point sits too high. Hidden leaks, poor drainage and uncertain tap backflow protection also need care. A plumber can check whether the layout needs a wider change.
UK rules are not all the same. In England and Wales, water fittings must meet the Water Supply (Water Fittings) Regulations. Scotland has its own water byelaws. A routine sink swap does not normally trigger the same checks as major new pipework. For major changes, ask your water supplier or building control which rules apply.
Final Thoughts: What Should You Check Before Using Your New Sink?
Knowing how to install a sink plumbing system is about more than connecting taps and pipes. A successful installation needs compatible fittings, secure joints and a clear drainage route. Before using your new sink, make sure everything works without leaks, slow drainage or unpleasant smells. If something seems wrong, fix the cause rather than simply tightening the fittings.
Most importantly, keep the plumbing accessible for future checks and repairs. That way, your sink stays easier to maintain and small problems are less likely to become costly repairs.
Ever wondered how the rest of your home’s plumbing works? Explore our Professional Plumbing Course and build the knowledge to understand pipes, fittings and common plumbing problems.
FAQs
1. Can You Install Sink Plumbing Yourself in the UK?
Yes, you can install sink plumbing yourself if the existing pipes are suitable. However, complex pipework or damaged connections need professional help.
2. Can You Install a New Kitchen Sink Without Changing the Existing Pipes?
Yes, you can reuse existing pipes if they fit the new sink and remain in good condition. Otherwise, some pipework may need replacing.
3. How Long Does It Take to Install Kitchen Sink Plumbing?
A straightforward sink replacement can take a few hours. However, changing old pipes or fixing unexpected problems can take longer.
4. What If the New Sink Waste Outlet Is Lower Than the Existing Drainpipe?
Wastewater may not drain properly if the outlet is too low. You may need to adjust the drainage layout or choose a different sink.
5. Can You Connect a Double Kitchen Sink to One Waste Trap?
Yes, you can connect both bowls to one suitable trap using a combined waste kit. Make sure the fittings match and drain properly.
6. Can You Connect a Dishwasher to a Kitchen Sink Waste Pipe?
Yes, you can connect a dishwasher to your kitchen sink’s waste system using a suitable trap connection. Secure the hose and follow the manufacturer’s instructions.
Professional Online Plumbing Course
Course Description :
- Certificate: Yes(Free)
- Accreditation: CPD Accredited
- Access: Lifetime