Imagine sitting in your quiet living room at night. Suddenly, you hear a very annoying sound from the nearby kitchen. It is a slow, steady “drip, drip, drip” coming from the sink. This sound is not just a small nuisance for your ears. In fact, that tiny leak is wasting many litres of fresh water every day. In the United Kingdom, water is a very precious and expensive resource.
Did you know a single leaky tap can waste 5,000 litres a year? That amount of water could fill many large bathtubs quite easily. Furthermore, this waste will surely increase your monthly UK water bill significantly. You might feel worried about the cost of calling a plumber. Professional plumbers in London or Manchester can be very expensive for small jobs.
Our goal is to empower you to handle this common household repair. You will save money and help the environment at the same time. Let us start by looking at what you need for this job.
What Tools and Materials Do I Need to Fix a Leaking Tap?
Before you start any work, you must gather your equipment. Having everything ready will make the process much smoother and faster. Most of these items are available at local shops like B&Q or Homebase.
Essential Checklist for Your DIY Project:
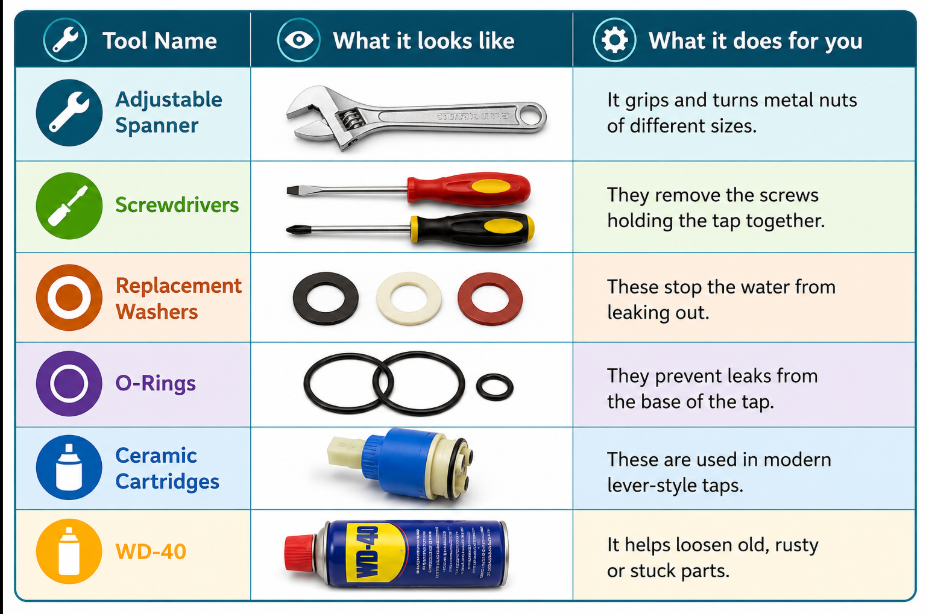
Additionally, you should keep some old towels or a soft cloth nearby. These will soak up any small spills on the kitchen floor. Sometimes, the metal parts of a tap can be quite slippery. Therefore, using a cloth helps you get a better grip with your tools.
You might also need a special tool called a tap spanner set. These are thin tubes that fit into very tight spaces under sinks. However, a standard adjustable spanner is usually enough for most kitchen taps. If the nuts are very tight, apply a little bit of WD-40. Wait for ten minutes to let the liquid work its magic.
Finally, ensure you have the correct replacement parts before you begin. It is helpful to take the old part to the shop. Then, you can show it to the assistant to get a match.
How Do I Prepare My Plumbing Before I Fix a Leaking Tap?
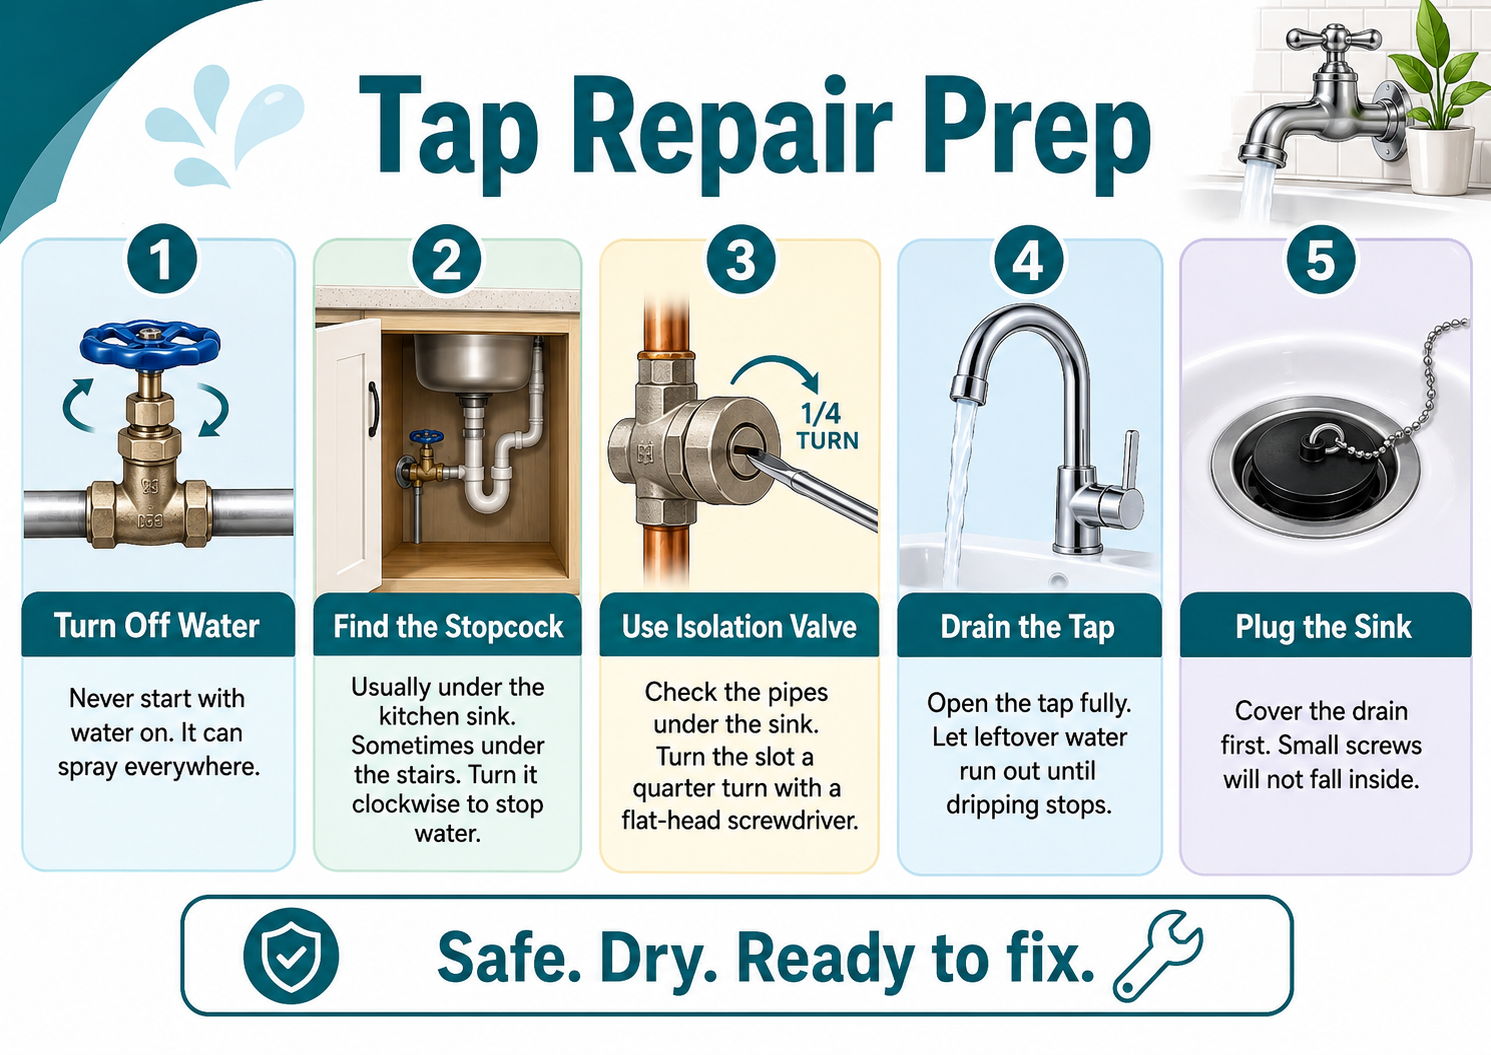
Safety is the most important part of any home repair job. You must never start taking a tap apart while the water is on. If you forget this step, water will spray all over your kitchen.
Where is my internal stopcock?
You must find the main water switch, called a stopcock. In most UK houses, this is located under the kitchen sink. Sometimes, you might find it in a cupboard under the stairs instead. It looks like a large, round metal handle on a heavy pipe. Turn this handle clockwise until it stops to shut off the water.
How do I use an isolation valve?
Look at the pipes directly under your kitchen sink for a small valve. These are called isolation valves and are very common in modern UK homes. They usually have a small slot for a flat-head screwdriver. Turn the screw a quarter turn until it is across the pipe. This action stops the water only for that specific kitchen tap.
Why must I drain the pipes?
Even after the water is off, some liquid remains inside the pipes. Therefore, you should turn the kitchen tap on to the full position. Let the remaining water flow out until the dripping finally stops completely. This step ensures there is no pressure left inside the metal tap body.
Moreover, it is a good idea to put the plug in the sink. This prevents small screws from falling down the drain by mistake. Losing a tiny screw can make the whole job much more difficult. Now your workspace is safe, dry, and ready for the next stage.
How to Identify Your Tap Type?
Not all taps are built in the same way in British kitchens. You must identify your tap type to choose the right repair method. Generally, there are two main types of taps found in most homes.
Traditional Taps
These are the older style of taps with separate handles for hot and cold. You usually have to turn the handle several times to get water. These taps use a small rubber washer to stop the water flow. Over time, the rubber becomes hard or cracked, which causes the leak.
Modern Ceramic Disc Taps
Many modern kitchens use taps with a single lever or “quarter-turn” handles. You only move these handles a little bit to turn them on. Instead of rubber, they use two smooth ceramic discs to control the water. These parts are usually contained inside a plastic piece called a cartridge.
| Feature | Traditional Tap | Ceramic Disc Tap |
| Handle Movement | Turns multiple times. | Turns a quarter or half way. |
| Internal Part | Uses a rubber washer. | Uses a ceramic cartridge. |
| Common Problem | The washer is worn out. | The cartridge is dirty or cracked. |
Identifying your tap correctly is essential for how to fix a leaking tap in the kitchen. If you have a lever tap, buying a rubber washer is useless. Similarly, a cartridge will not fit inside an old-fashioned pillar tap. Take a close look at how your tap moves before you go shopping.
How to Fix a Traditional Leaking Tap?
If you have a traditional tap, the repair is usually very cheap. You will likely only need to replace a small rubber washer.
Step 1: Removing the decorative cap
Look for the small cap on top of the tap handle. It often says “H” for hot or “C” for cold. Use a flat-head screwdriver to gently pry this plastic cap off. Be careful not to scratch the shiny chrome finish of the metal.
Step 2: Unscrewing the handle and headgear nut
Under the cap, you will see a small metal screw holding the handle. Remove this screw and pull the handle straight up and off the tap. Now, you will see a large brass nut called the headgear nut. Use your adjustable spanner to turn this nut anticlockwise until it comes out.
Step 3: Removing the old rubber washer and seating
Once the headgear is out, look at the bottom of the internal part. You will see a small, round black rubber disc held by a nut. This is the washer that is likely causing your kitchen tap leak. Remove the old, damaged washer using your fingers or a pair of pliers.
Step 4: Fitting the new washer
Take your brand-new washer and push it firmly into the same position. It should fit snugly without moving around too much in the metal seat. If the old nut is rusty, you should replace that small nut too.
Step 5: Reassembling and testing
Put the brass headgear back into the tap and tighten it with the spanner. Replace the handle and the small screw you removed earlier in step two. Finally, turn your water supply back on slowly at the main stopcock. Check the tap to see if the annoying “drip-drip” sound has finally stopped.
How to Fix a Modern Ceramic Disc Tap?
Modern taps are very common in new apartments and renovated UK kitchens. They are elegant but require a different approach when they start to leak.
Step 1: Locating the hidden grub screw
Most modern lever taps do not have a visible screw on the top. Instead, look for a tiny hole at the back or side of the handle. Sometimes, a small plastic button hides this hole from your view. Use a small Allen key or screwdriver to loosen the hidden “grub screw” inside.
Step 2: Removing the lever to reveal the cartridge
Once the screw is loose, lift the metal handle off the tap body. You might see a decorative metal shroud or cover over the internal parts. Simply unscrew this cover with your hand to see the plastic cartridge inside.
Step 3: Using a spanner to remove the old ceramic cartridge
Use your adjustable spanner to grip the top of the large brass cartridge. Turn it anticlockwise with a firm and steady movement to unscrew it. Be careful not to apply too much force, as you might damage the pipes.
Step 4: Replacing the cartridge
Ensure the new cartridge is the same size as the old one. In the UK, these are usually half-inch or three-quarter-inch sizes. Drop the new cartridge into the tap and align the small lugs at the bottom. Tighten everything back up and put the handle back on the tap.
Specifically, ensure the cartridge is seated correctly before you tighten the brass nut. If it is crooked, the tap will leak even worse than before. Test the lever to make sure it moves smoothly and feels very solid.
Why is My Tap Still Leaking After I Replaced The Washer?
Sometimes, you follow every step but the water continues to drip slowly. Do not feel frustrated because this happens to many DIY beginners.
Common Issues to Check:
One common problem is a damaged “valve seat” inside the tap body. The valve seat is where the rubber washer presses down to stop water. If this metal part is corroded, the washer cannot make a perfect seal. You may need a tool called a “seat grinder” to smooth it.
Another issue involves buying the wrong size of washer or ceramic cartridge. British taps come in several different standard sizes for kitchen and bathroom use. Even a tiny difference in size can allow water to seep through. Always double-check your measurements at the hardware store before buying new parts.
Additionally, look at the very base of the tap spout for leaks. If water leaks from the bottom of the neck, the O-ring is broken. The O-ring is a very thin rubber loop found inside the spout base. Replacing this part is very easy and usually stops that specific type of leak.
Furthermore, check for any limescale buildup inside the metal tap components. Limescale is a hard white substance often found in “hard water” areas of England. You can remove it by soaking the parts in a bowl of vinegar. Clean parts always work better and last much longer than dirty ones.
When Should I Call a Professional UK Plumber?
Most people can successfully learn how to fix a leaking tap in the kitchen. However, there are times when you should put your tools away and call for help.
When the tap body is cracked
If you see a crack in the main metal body, it is broken. No amount of new washers or cartridges will fix a physical crack. In this situation, you must buy a completely new tap for your kitchen. Installing a new tap is a much bigger job for a professional.
If the stopcock is seized
Sometimes, old stopcocks in UK houses become stuck and will not turn. Never use extreme force to turn a stuck water valve in your home. You might snap the pipe and cause a massive flood in your house. A plumber has special tools and experience to fix a seized main valve safely.
If you live in a rented property
This is a very important point for many people new to the UK. Most tenancy agreements state that the landlord is responsible for all plumbing repairs. If you try to fix it and make a mistake, you might lose your deposit. Therefore, always call your landlord or letting agent first to report the leak.
Usually, they will send a professional plumber to fix the issue for free. This protects you from any legal or financial problems with your rental contract.
Conclusion on Fix a Leaking Tap
Fixing a leaking tap is a wonderful way to start your DIY journey. We have covered the tools, the preparation, and the different types of taps. By following these steps, you have learned a very valuable skill for life.
Think about the money you have saved by avoiding a professional plumber. Also, remember that you are protecting the environment by saving thousands of litres of water. A small drip might seem minor, but fixing it makes a big difference.
Moreover, your kitchen will be much quieter without that constant tapping sound at night. You can now feel proud of maintaining your UK home with your own hands. Always remember to work slowly and keep your tools organised during the process.
If you ever feel unsure, join our Professional Online Plumbing Course for expert guidance. Most tap repairs in the kitchen take less than thirty minutes to finish. Congratulations on taking this step toward becoming a confident and capable home explorer! Keep your spanner ready for the next small project in your beautiful kitchen.
FAQs
1. How do I stop my kitchen tap from dripping?
- Turn off the water supply and check the washer, O-ring, or cartridge. Replacing a worn part often stops the drip.
2. Can I fix a leaking tap myself?
- Many minor tap leaks can be fixed with basic tools and replacement parts if you follow the manufacturer’s instructions.
3. Why is my kitchen tap dripping when the water is off?
- A worn washer, damaged cartridge, or faulty valve may not be sealing properly, allowing water to drip.
4. What is the most common cause of a leaking tap?
- The most common cause is a worn washer or cartridge that no longer creates a watertight seal.
5. Do you need a plumber to fix a dripping tap?
- Simple leaks can often be repaired yourself, but a plumber may be needed for complex or persistent issues.
6. How much will a plumber charge to fix a dripping tap?
- In the UK, fixing a dripping tap typically costs between £50 and £150, depending on the repair and location.