Preparing a natural henna paste is like waking up colour from dried leaves. You mix fresh body art quality henna powder with water or lemon juice, sugar, and a safe essential oil. Then, the paste rests until its natural dye becomes active. Homemade henna gives you full control over texture, smell, freshness, and stain depth. More importantly, it helps you avoid unknown ready-made cones. Real henna should stain orange, reddish-brown, or chocolate brown, never jet black.
In this guide, you will learn the right ingredients, mixing steps, dye release time, texture tips, storage advice, and simple ways to get a darker, longer-lasting stain.
What Is Preparing a Natural Henna Paste at Home?
Preparing a natural henna paste at home means making fresh henna paste with simple, skin-safe ingredients. You mix henna powder, liquid, sugar, and essential oil. Then you rest the paste until the natural dye becomes active.
This process is different from using chemical cones bought in grocery stores. Fresh paste relies on a natural chemical reaction. You are waking up the lawsone molecules, which are the natural dyes found in the henna leaf. Because this is an organic product, it requires a resting period. This time is known as dye release. When you prepare it yourself, you ensure the final colour is rich and the ingredients are transparent. Fresh paste is a perishable item, much like fresh food. It gives the best results when used at its peak.
The fact is that fresh henna gives you more control.
Why Make Natural Henna Paste Instead of Buying Ready Cones?
Homemade henna paste is fresher, safer, and easier to control. Ready-made cones can lose strength when they sit on a shelf for months. Some cheap cones may also contain unknown additives. These can include PPD (p-phenylenediamine), kerosene, or ammonia. The British Skin Foundation wanrs that these chemicals may cause serious allergic reactions and lasting scars.
When you mix your own, you become the creator. You can choose a scent by selecting specific essential oils. You can make it thicker or thinner to match your design needs. If you want thin, wispy lines, you can make a stringy paste. For bold patterns, you can make it thicker. Making your own paste also saves money over time. You can freeze extra paste so nothing goes to waste.
The surprising part is that freshness can change the whole stain. Think of it like fresh food. Old ingredients might look fine, but they usually perform poorly.
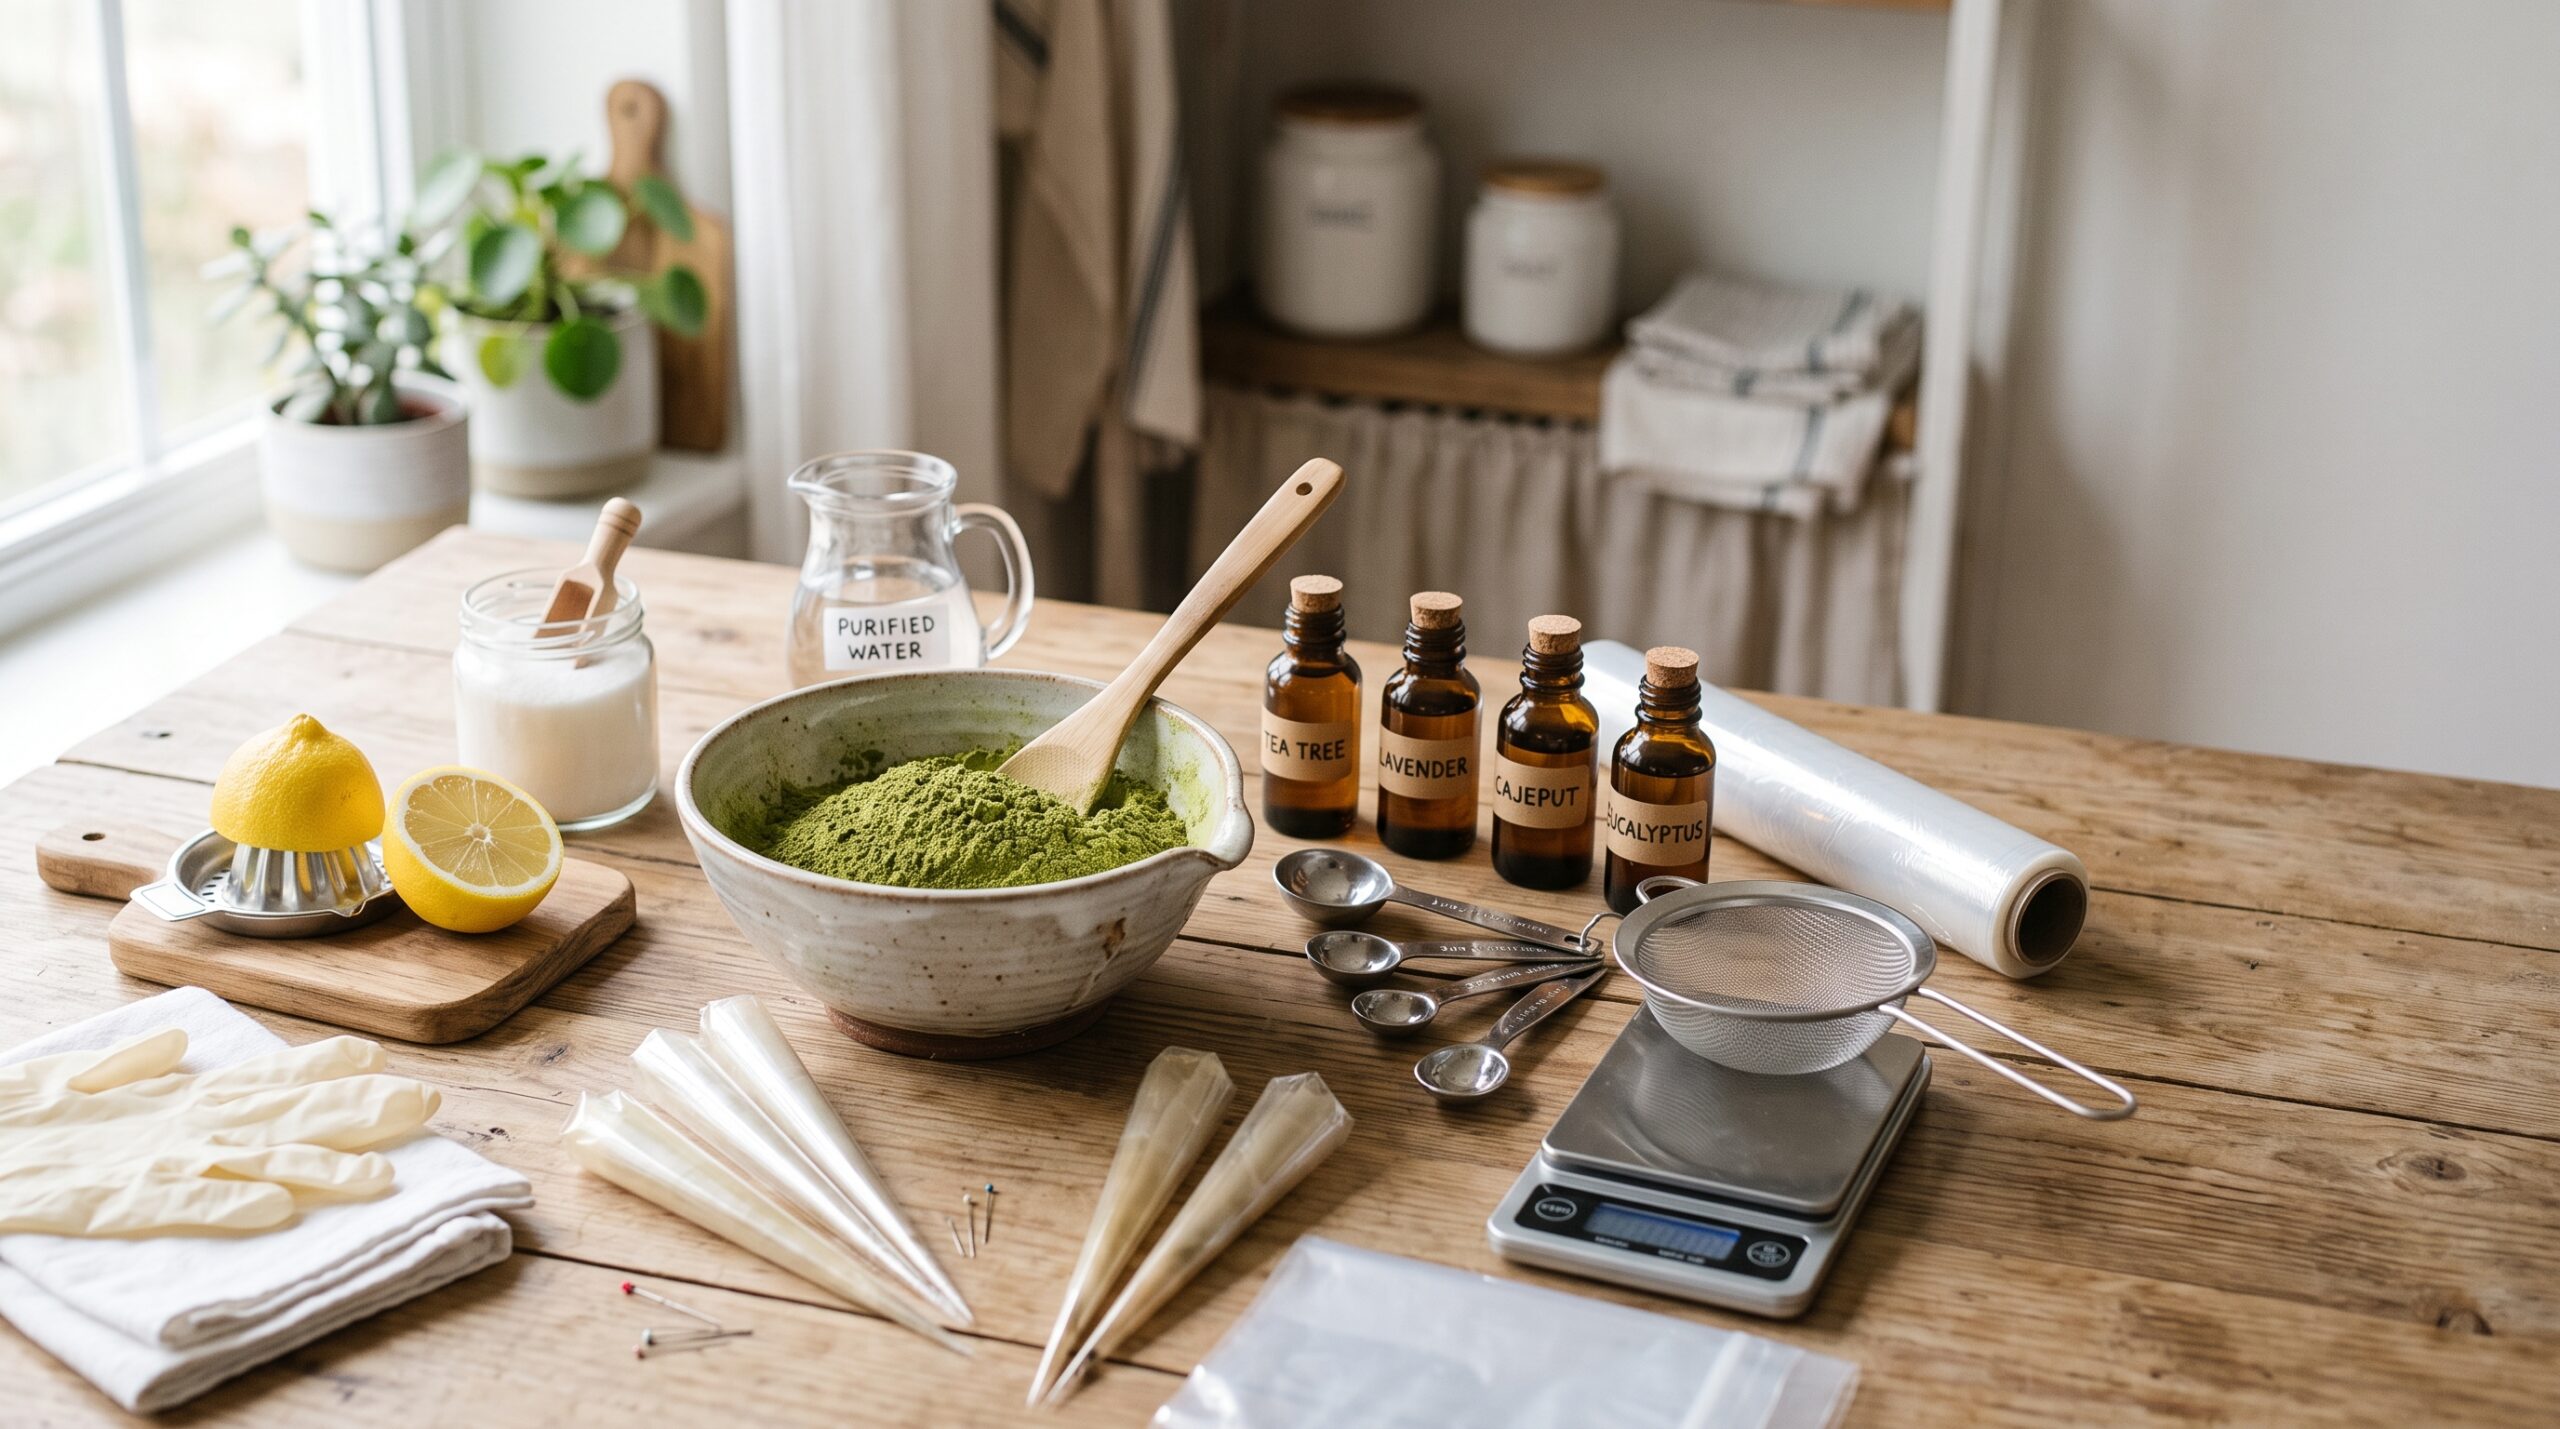
What Tools Do You Need to Make Natural Henna Paste?
Before you start, gather these items to keep your workspace tidy.
- Glass or ceramic bowl: Avoid plastic as henna can stain it.
- Spoon or spatula: For thorough mixing.
- Fine sieve or nylon stocking: To ensure a smooth, clog-free paste.
- Cling film: To cover the paste during dye release.
- Transfer bag: A sturdy sandwich bag or piping bag.
- Henna cones or bottles: Your final applicator tools.
- Measuring spoons or a digital scale: Best for getting exact measurements.
- Gloves or tissues: To prevent staining your hands during the mix.
What Ingredients Do You Need for Natural Henna Paste?
To get the best results, you must use high-quality materials. Using cheap ingredients often leads to a disappointing stain.
| Ingredient | Main Job |
| Body art quality henna powder | Gives natural dye and smooth paste |
| Water or lemon juice | Helps release the dye |
| Sugar | Keeps paste moist on skin |
| Essential oil | Supports stain depth and scent |
| Extra liquid | Adjusts paste texture |
A good paste starts with clean, fresh ingredients. Bad powder can cause weak colour, clogs, and rough lines. Always check that your powder is a vibrant green colour and smells like dried grass. Note that the water amount can change by powder brand. Add it slowly, not all at once, to avoid making the mix too runny.
The simple fact is that every ingredient has a clear job.
Which Henna Powder Is Best for Skin Designs?
Use fresh body art quality henna powder for skin designs. It should be finely sifted and made for body art, not hair dye. Better powder gives smoother paste and stronger stains.
Look for “BAQ” on the packaging. Avoid grocery store henna meant for hair, as it often contains grit or metallic salts. Triple-sifted powder is the best choice for beginners. It goes through a fine mesh three times to remove any leaf veins or sticks.
Rajasthani powder from India is popular because it is very elastic. This makes it perfect for drawing long, thin lines. Jamila powder from Pakistan is known for its creamy, buttery texture. It works well for filling in large shapes or making thick dots.
What matters most is that you start with the right powder.
Which Liquid, Sugar, and Essential Oil Should You Use?
Choosing your secondary ingredients carefully will help you achieve a professional finish.
What Liquid Should You Mix With Henna Powder?
Use a water-based liquid for henna paste. Water is easy for beginners because it is neutral. Lemon juice can also work, but its acidity may slow down the dye release process.
When deciding what liquid to mix with henna, consider your timeline. Water usually releases the dye in a few hours. Lemon juice can take up to 24 hours. You can even mix the two. Some people use herbal teas, but for a first-time batch, keep it simple. Oil cannot activate henna powder properly on its own. Always use room-temperature liquid for a stable mix.
Why Do Henna Artists Add Sugar to Henna Paste?
Sugar helps henna paste stay wet and sticky on the skin. This gives the dye more time to work. It also helps the paste hold better during design work.
In the UK, indoor heating can be very dry during winter. Adding sugar in henna paste prevents the design from drying out and cracking off too quickly. If the henna falls off in 30 minutes, it won’t leave a dark stain. The sugar keeps the paste flexible so you can move your hand without the design breaking. Use plain white sugar for the smoothest results.
Which Essential Oil Works Best for Henna Paste?
Many henna artists use terpene-rich essential oils. Tea tree, cajeput, lavender, and eucalyptus are common choices. Still, essential oils should be used in small amounts. These oils help the lawsone dye penetrate the skin more deeply.
The best essential oil for henna paste depends on your needs. Lavender is the mildest and is often used for children or people with sensitive skin. Tea tree and cajeput provide very dark stains but have a strong, medicinal scent. Never use “fragrance oils” or “perfume oils,” as these contain synthetic chemicals that do not help the stain.
The interesting thing is that small ingredient changes can change the final paste.
What Is the Best Natural Henna Paste Recipe for Beginners?
Beginners should start with a small batch. It saves powder and makes texture easier to learn. A small batch also helps you test your powder, liquid, sugar, and oil balance.
Small-batch natural henna paste recipe:
- 25g henna powder.
- 13g sugar (about 1.5 teaspoons).
- 7.5 ml essential oil (about 1.5 teaspoons).
- Around 1/4 cup (60 ml) of water.
Larger batch option:
- 100g henna powder.
- 2 tablespoons of essential oil.
- 1/4 cup sugar.
- Around 3/4 cup (180 ml) purified water.
The reality is that small batches teach you faster.
So, What Are the Steps for Preparing a Natural Henna Paste at Home?
The best way is to mix slowly, rest the paste, test dye release, adjust texture and then fill cones. Do not rush the water stage. Too much liquid can ruin the paste. So just follow these easy steps:
- Add henna powder to a clean glass bowl. Sift it first if it looks lumpy.
- Mix sugar into the dry powder until it is fully incorporated.
- Add water slowly, stirring as you go. Aim for a stiff, mashed-potato texture.
- Add essential oil and stir thoroughly.
- Mix until the paste is thick and relatively smooth.
- Cover the bowl with cling film. Press the film down so it touches the paste surface.
- Let the paste rest in a warm spot, out of direct sunlight.
- Do a spot test on your palm to check for dye release.
- Adjust the texture by adding tiny drops of liquid until it flows like thick honey.
- Fill your cones or bottles using a transfer bag.
The remarkable thing is that slow mixing gives a smoother paste.
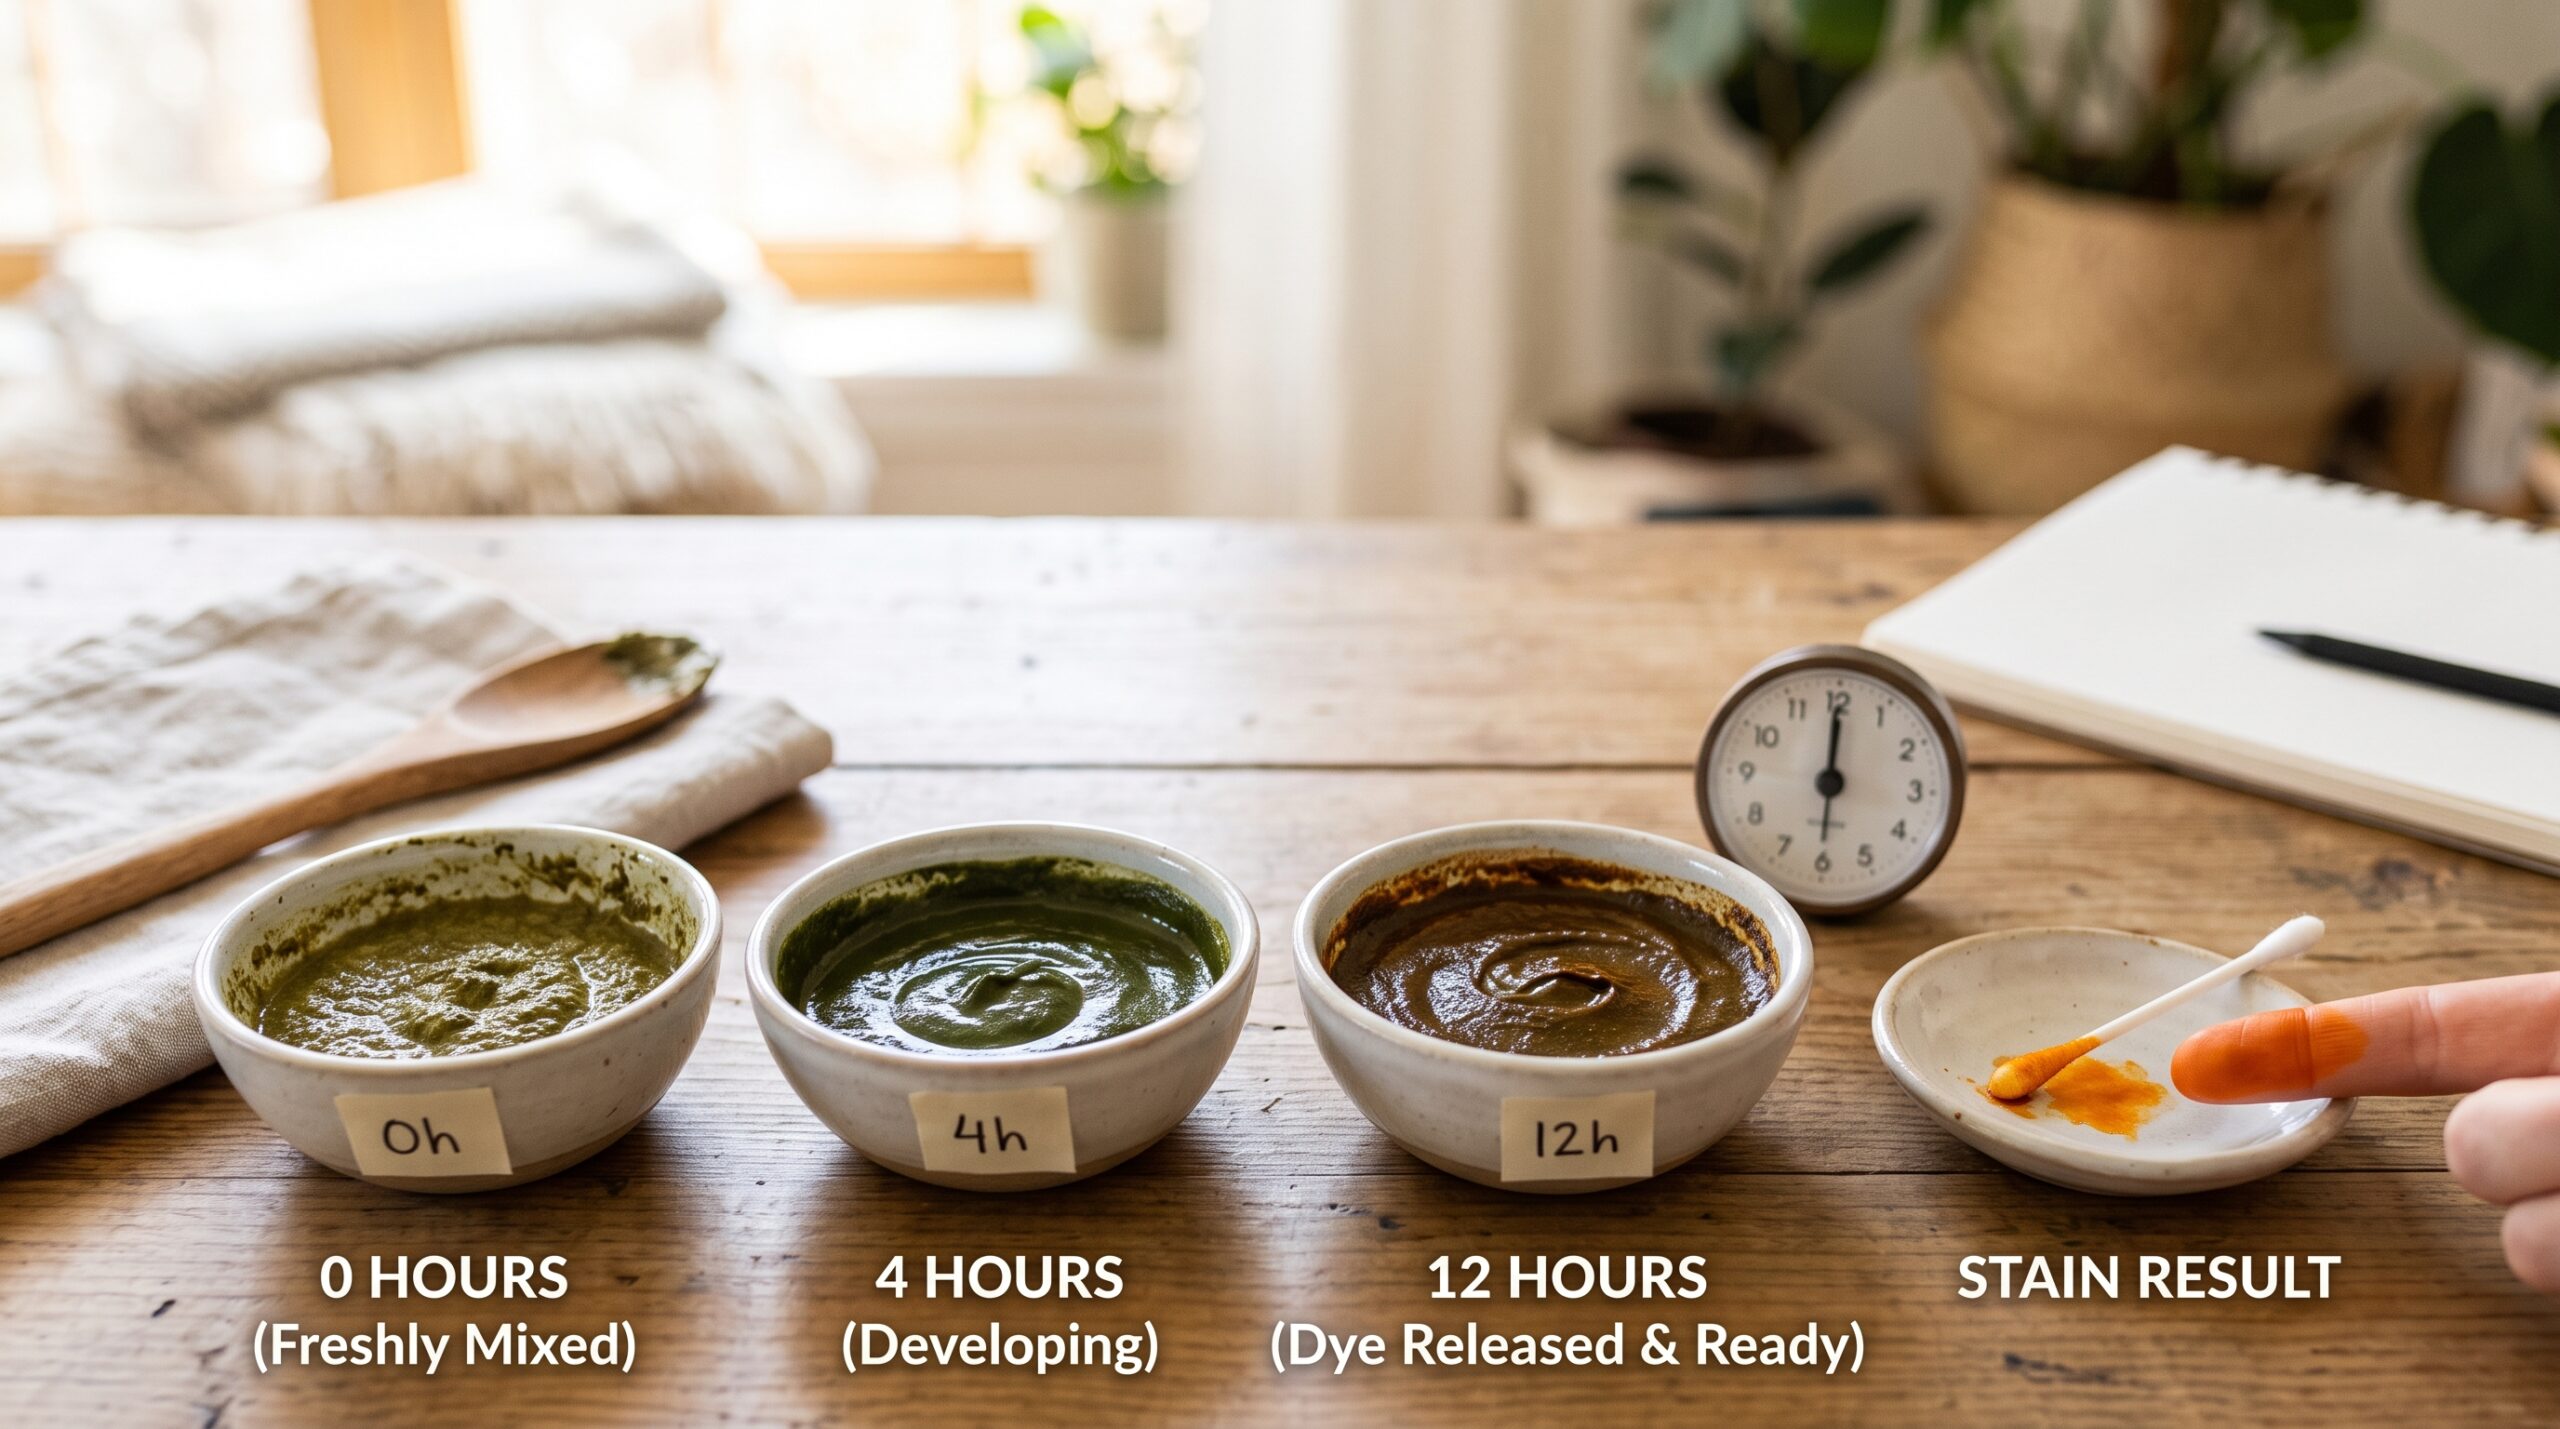
How Long Should Henna Paste Sit?
Henna paste must rest until the natural dye becomes active. This is called dye release. To check it, place a small dot on your palm or fingertip. If it leaves a bright orange mark after one minute, the paste is ready.
The henna dye release time changes based on the room temperature. UK homes can be cool in the winter, so the process may take longer. Usually, water-based mixes take 6 to 12 hours. Lemon juice mixes can take 24 hours. If your room is very cold, you might need to wait 48 hours.
If the paste is left out too long, it will over-release. This means the dye becomes weak and turns a dull brown. A henna paste spot test that leaves a pale, muddy colour instead of bright orange suggests the dye is past its best stage. Freeze-ready paste quickly to protect the stain if you aren’t using it immediately.
The challenge is that timing changes with heat and powder type.
How Do You Get Smooth Henna Paste and Fill Cones Without Clogs?
Good henna paste should move easily but not run everywhere. Many artists describe it as thick yoghurt or toothpaste. Once smooth, you can fill cones or bottles without messy clogs.
Start thicker than you need. You can always add more water, but adding more powder to a wet mix can cause lumps. More mixing makes a silkier paste because it develops the natural plant mucilage. If your paste feels gritty, you can strain it through a nylon stocking.
To learn how to fill henna cones, place the empty cone in a tall glass. Use a transfer bag to pipe the paste into the bottom. Fill it only halfway so you have space to seal it. Achieving the right henna paste consistency takes practice. If it’s too runny, the lines will bleed. If it’s too thick, your hand will ache from squeezing.
The biggest issue is that beginners add too much liquid too fast.
How Should You Store Homemade Henna Paste?
Fresh henna paste does not last long at room temperature. Use it fresh, keep it cold for short-term use, or freeze extra paste for later.
You should know how to store henna paste to keep it potent. In the fridge, it lasts about 2 to 3 days. Frozen henna paste often keeps well for 6 months. Some artists store it longer, but fresher paste usually gives more reliable stains. When you are ready to use it, let it thaw at room temperature for 15 minutes. Avoid thawing and refreezing the same cone multiple times.
How to Know When Paste Has Gone Bad?
If the paste smells sour or mouldy, throw it away. Another sign is the colour. If it turns a dark, watery brown and the spot test is very faint, the dye has faded.
The unexpected thing is that old paste can look fine but stain badly.
Is Natural Henna Paste Safe for Skin?
Natural henna is usually safe for most people when made with clean ingredients. Still, avoid black henna and chemical-smelling cones. Natural henna should not smell like bleach.
The NHS advises extreme caution regarding “black henna” tattoos. These are not real henna and often contain high levels of PPD, which can cause chemical burns. Always do a patch test 24 hours before a full design if you have sensitive skin.
When Should You Avoid Henna?
People with G6PD deficiency should speak to a doctor before using henna, especially on children. This is a rare genetic condition where certain substances can cause blood cells to break down. While natural henna is safe for the general public, medical advice is best for those with known health conditions.
The fact is that natural henna should never smell like chemicals.
Why Is My Henna Paste Not Staining Well?
Weak stain usually comes from old powder, poor dye release, or poor aftercare. The good news is that most problems are fixable. If you are asking why is my henna paste not staining, look at these common points:
- Old powder: Use fresh body art quality powder.
- No dye release: Let the paste rest longer in a warm spot.
- Too much liquid: Mix more slowly next time to keep the dye concentrated.
- Dry paste: Add a little more sugar next time to help it stick.
- Clogging: Sift your powder or strain your paste through a stocking.
- Water exposure: Avoid washing the area with soap for the first 24 hours.
The honest truth is that most weak stains start before the paste reaches the skin.
Final Thoughts: Is Preparing a Natural Henna Paste Worth It?
Yes, preparing a natural henna paste is worth it if you want fresher, safer, and better-looking designs. You control every part of the paste. You ensure the powder is high quality and the oils are skin-safe. While the process takes time, the result is a beautiful, deep stain that is healthy for your skin.
Start with a small batch this week. Test your paste, learn the texture and build confidence before making cones for others.
FAQs About Preparing a Natural Henna Paste
How to prepare natural henna?
- Mix body art quality henna powder with water or lemon juice, sugar, and a safe essential oil. Cover it and let it rest for dye release. When it leaves a bright orange spot, adjust the texture and fill your cones.
Is henna good for low porosity hair?
- Henna can work on low porosity hair, but use it carefully. It may make hair feel dry or stiff. Do a strand test first. Then deep-condition after rinsing.
Is henna good for fungus?
- No. Do not use henna to treat fungus. It is not an antifungal medicine. If you have itching, patches, or ringworm, speak to a pharmacist or GP.
Why add apple cider vinegar to henna?
- Apple cider vinegar has a low pH, so some people add it to help henna release dye. Still, it can dry or irritate the scalp. Water is safer for beginners. Use only a small diluted amount.
What not to mix with henna?
- Do not mix henna with bleach, ammonia, perfume oil, kerosene, hair dye, or random chemicals. Also avoid black henna. Natural henna needs a water-based liquid.
What are the side effects of apple cider vinegar on hair?
- Apple cider vinegar can make hair dry, rough, or frizzy. It can also irritate the scalp or sting broken skin. Never use it without dilution.
Why is my hair falling out after apple cider vinegar?
- Apple cider vinegar may dry the scalp or weaken hair strands. This can cause more breakage or shedding. Stop using it if your scalp burns, itches, or flakes.